This is an old revision of the document!
Start working with Ysell.pro software system
Welcome to Ysell system! Ysell allows to achieve automatic work with the Prep center. You need to set initial settings to use it efficiently.
1. Getting the access to Ysell features
Apply a request for creating a new Prep center account https://ysell.pro/
2. Entering payment details and address of the Prep center
Indicate the address of the Prep center, it’s necessary to get the access to full functionality of Ysell system. The address you indicate will be used for invoice creation, packing list generation and also it’ll be used by clients for creating shipments to the warehouse.
1. Go to Menu - Settings and go to Companies. Select Add new company after clicking the “+” button. Enter the name of your Prep center.


2. System will inform you about creating a new company. All companies get their own IDs. Go to editing information of the company by clicking the Pen icon. Go to the Address tab.


3. Fill the legal address of the company in the Company address fields. Enter the actual address of the company in the Shipping address fields.Save entered information.


Adding stocking places
Put the information about stocking places. Clicking Warehouse in the menu select the Warehouse tab. Click Create warehouse and indicate the information about the warehouse.

Name - Name of the warehouse.
Short name - Acronym of the warehouse.
Country Id - Country of the warehouse.
Default warehouse - Ticking box for indicating the warehouse as default.
Different products on one place - Indicate Allow for opportunity of stocking different SKUs.
Allowed saleschannels - Available saleschannels for the warehouse. If none was selected then all is available.
Click Save
Перейдем к добавлению складских мест. Вы можете добавлять складские места как по одному, нажатием на Create Storage Place, так и по заданному количеству (Begin - первый номер, Qty - количество создаваемых полок). Нажатием на иконку карандаша перейдем к редактированию информации о складском месте.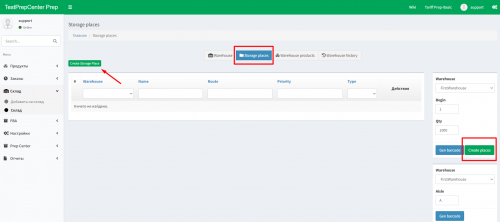


Warehouse - Выберите один из ранее созданных складов
Name - Укажите название складского места.
Type - Тип складского места. Это может быть полка (shelf) либо паллета (Pallet)
Route - Путь до складского места. К примеру, если задать значение 2 для полки с приоритетом 5, и 1 для полки с приоритетом 4, путь будем проложен по маршруту 2-1.
Priority - Укажите приоритет складского места. Если продукт лежит на нескольких складских местах, то приоритет списания будет у места с большим приоритетом.
Нажатием на Save сохраните введенную информацию
3. Услуги ( Services)
Рассмотрим списки услуг, предоставляемых для клиентов Преп центром. Перейдите в меню Services - здесь находится список услуг, которые Преп центр предоставляет клиентам. Для унификации мы предлагаем Преп центрам в Ysell список услуг, которые они предоставляют по умолчанию.

Вы можете самостоятельно указать услуги, которые будут предоставляться вашим клиентам. Для создания услуги нажмите на Create Service в блоке Customized services.


Status - Ползунок в статусе Active указывает, что услуга активна. Inactive - не активна.
Name RU - Укажите описание услуги на русском языке
Description RU - Описание услуги.
Shipment types - Типы отправок, которым применима услуга.
Action Type - Действие, которое применяется по услуге.
Price - В блоке указывается цена за услугу. Price type - используйте single для указания фиксированной цены услуги. Scale - для шкалирования цены в зависимости от объема.
Setting for sets/bundles. Payment per - параметр, отвечающий расчет цены для сетов, или единичных товаров.
Price - цена услуги. Валюта, в которой ведется расчет, указывается в настройках преп центра.
Нажатием на Save сохраните введенную информацию
Дополнительная информация по созданию услуг
Для того, что указать специальную цену для клиента, перейдите в раздел “Настройки”, выберите компанию клиента, и перейдите на вкладку Prep. Отредактируйте цену за услугу в столбце Override Price

4. Создание клиентского аккаунта из преп центра
Вы можете самостоятельно создавать для клиентов аккаунты в Ysell. Для создания аккаунта ysell для клиента перейдите в раздел “Настройки”-“Компании”. После нажатия на иконку карандаша, выберите функцию “Create new prep client”Укажите адрес электронной почты, название компании. Активный чек-бокс Notify user by email оповестит клиента по создании учетной записи по адресу электронной почты.
Дополнительная информация о создании клиентского аккаунта ysell со стороны Преп центра.


5. Привязка клиентского аккаунта к Преп центру
Чтобы привязать к Преп центру существующий клиентский аккаунт Ysell, перейдите в меню “Настройки”- “Компании”. После нажатия на иконку со знаком “+” выберите выпадающий пункт “Connect prep client” и введите ID компании клиента.

